Import Templates
Scifeon offers an advanced feature to import data directly from Excel or CSV files into the system. This capability allows you to seamlessly integrate external data into your laboratory workflow. The import process is highly configurable, covering everything from general file settings and date formats to complex field mapping and duplicate management.
You find the Import Templates (2) in the Administration (1) section of Scifeon. You need to be Administrator or Data Manager to access this feature. The Import Templates defined will always be checked against the file you are trying to upload e.g. on the Upload Page or in the ELN. If a match is found, the import will be performed using the selected Import Template. If no match is found, other Data Loaders might match the uploaded file.

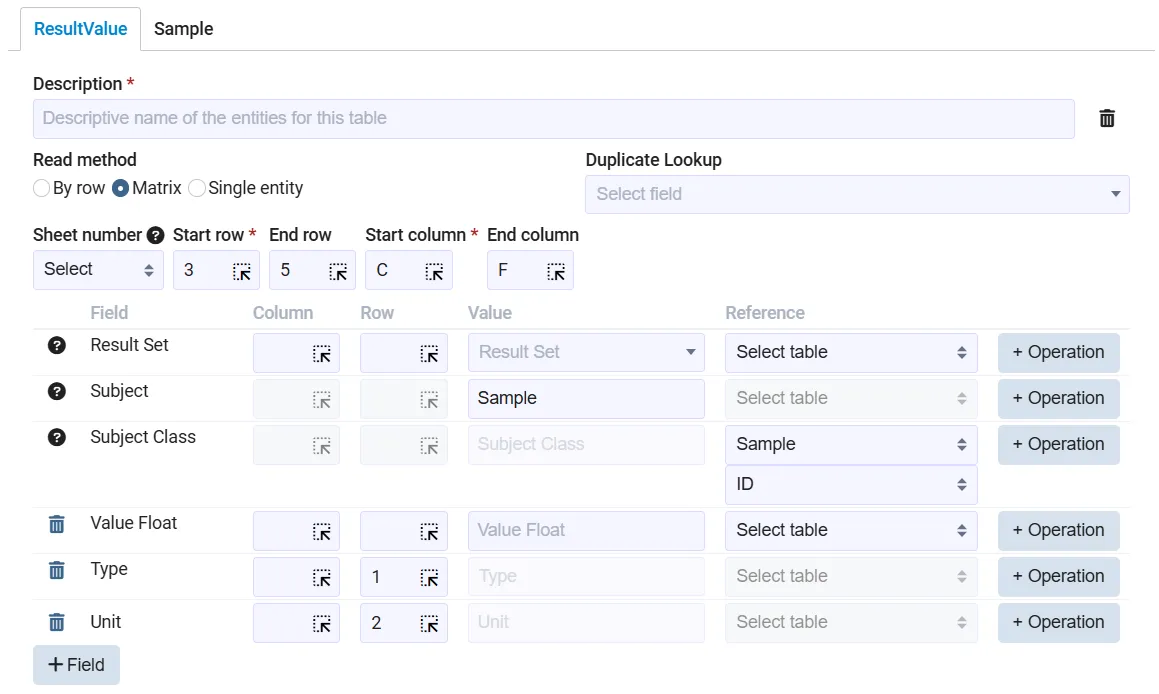
The Import Templates defines Entity Tables with Fields. Each Entity Table generates 1 or more entities in the system. For each Entity Table relevant Fields are selected. The Read Methods section describes the different ways of defining Entity Tables. The Field Mapping and Value Operations section describes how to map the data in the file to the Fields in the Entity Tables.
General Configuration
Section titled “General Configuration”Before the data import begins, you must set up several general parameters:
- File Type: Choose the file type for import: Excel or CSV.
- File Matching: Configure criteria to match files based on their names, so an Import Template is automatically selected when uploading an Excel or CSV file.
- Date Formats: Define how dates are formatted in the file.
For Excel files, it is also necessary to select the correct sheet for each Entity Table by specifying its number. This is important because some files may have dynamic sheet names. In the case of CSV files, the content is automatically translated into a spreadsheet-like format, maintaining consistent positional references (e.g., cell C4 represents column 3, row 4).
Read Methods
Section titled “Read Methods”Scifeon supports three different methods for generating entities from your file. Each method is designed to cater to different data layouts and user requirements.
1. By Row
Section titled “1. By Row”In the “By Row” method, each row in a specified range of the file corresponds to one new entity.
Configuration Details:
- Row Range: Specify the starting row and optionally the end row.
- Excel Specific: The sheet number must be provided since sheet names might change dynamically.
- Field Mapping: Each field is mapped to a specific column within the row:
- Column Number: Specify the column number for each field (e.g., column 3 for
SampleName). - Hardcoded Values: You can also assign fixed values to fields, which will be applied to all entities created from that row.
- Reference Other Entities: Link fields to data from previously defined entity tables (e.g., setting a subject ID for result values by referencing a sample record).
- Column Number: Specify the column number for each field (e.g., column 3 for
This method is straightforward and well suited for data that is organized in a single, continuous format.
2. Matrix
Section titled “2. Matrix”The Matrix method is used to import data from a defined rectangular area in the spreadsheet. Each cell within the matrix area results in a new entity being created. This is particularly useful when values are organized in a grid, and additional context—such as labels, categories, or units—is located in header rows or columns outside the matrix itself.
Defining the Matrix Area
Section titled “Defining the Matrix Area”To configure a matrix import, you specify the rectangular area where the data is located:
- Start Column / End Column: Defines the horizontal range (e.g. column C to column F).
- Start Row / End Row: Defines the vertical range. The end row can be omitted if the data continues to the bottom of the file.
- One Entity per Cell: Each cell in this area will produce a new entity.
For example, a matrix from C3:F5 means the values start on row 3 and continue down to row 5, and across columns C to F.
Configuring Fields
Section titled “Configuring Fields”Each field in the entity table can be configured to pull its value from one of three sources:
- From the Cell Itself: This is typically used for the main value in the matrix. The system reads the value directly from the current cell. Here no column or row must be set.
- From a Header Row or Column: Some fields can be configured to pull from a different row or column—relative to the current cell position.
- For example, a field like
Typecan be set to read from row 1, andUnitfrom row 2. When processing the cell atC3, the system will look atC1for theTypeandC2for theUnit.
- For example, a field like
- Hardcoded Value: You can also define a fixed value for any field, which is applied to all entities.
- Reference Other Entities: Link fields to data from previously defined entity tables (e.g., setting a subject ID for result values by referencing a sample record).
Example Setup
Section titled “Example Setup”Consider this example:
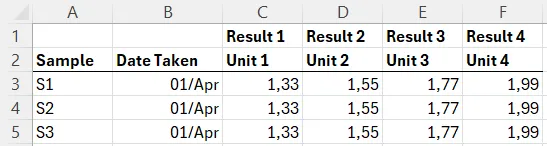
A common use case might involve:
- A matrix of data values in cells
C3:F5. - Row 1 containing labels (used as a
Typefield). - Row 2 containing units (used as a
Unitfield). - Each field is configured like this:
- ValueFloat: from the matrix cell itself (e.g.,
C3) - Type: from the same column, but row 1 (e.g.,
C1) - Unit: from the same column, but row 2 (e.g.,
C2)
- ValueFloat: from the matrix cell itself (e.g.,
As the importer iterates through the matrix, it reads each value along with its corresponding context, resulting in well-structured and fully linked data entries. The following example illustrates this setup (please note that ValueFloat is not set):
3. Single Entity
Section titled “3. Single Entity”The “Single Entity” method allows for static field assignment by directly specifying cell positions or fixed values.
Configuration Details:
- Direct Cell Mapping: Map fields by pointing to specific cells.
- Hardcoded Values: Alternatively, assign a constant value to a field.
- Reference Other Entities: Link fields to data from previously defined entity tables .
This method is useful when key information is always located in the same spot on the spreadsheet or when certain fields require consistent, predetermined values.
Field Mapping
Section titled “Field Mapping”Mapping data fields from the Scifeon data model to specific positions in your file is a crucial step. The configuration process allows you to:
- Select Fields: Choose from all available fields defined in the data model.
- Set Data Sources: Assign a cell position or a range for each field.
- Assign Hardcoded Values: Provide static values when needed.
- Reference Other Entities: Link fields to data from previously defined entity tables (e.g., setting a subject ID for result values by referencing a sample record).
Value Operations
Section titled “Value Operations”In addition, a range of built-in value operations is available to transform and clean up data before it is sent to the database. Some of these operations include:
- Text Before/After: Extract text based on a delimiter (useful if two pieces of data are combined in one cell).
- Text Between: Extract text that lies between two specified delimiters.
- Text Replace / Replace Exact: Modify the data by replacing text patterns, either partially or only when the entire cell value matches.
- Text Extract: Capture specific parts of the data if a certain pattern is present.
- Text Includes: Replace the value entirely if it contains a specific pattern.
These operations help prepare your data in the expected format and ensure consistency throughout the import.
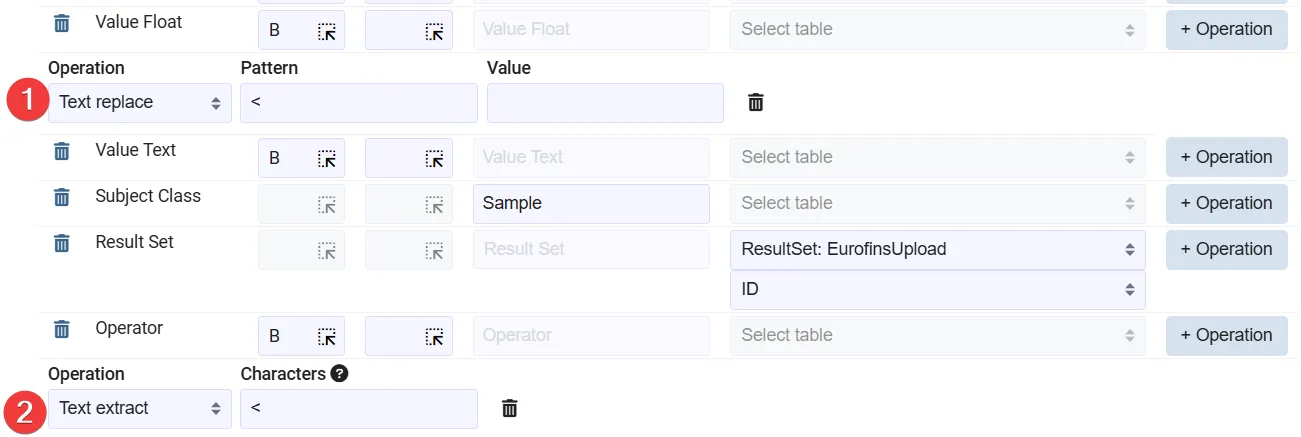
Example: extract result operator
Section titled “Example: extract result operator”In the following case, the cells includes < in some cases when the value cannot exactly be measured. The operator Text replace (1) is used to remove the < and only keep the numeric value. For the Operator field the Text extract (2) is used to extract the text < if it is there. Everything else is removed.
Duplicate Lookup
Section titled “Duplicate Lookup”To prevent multiple entries of the same entity, Scifeon provides a duplicate lookup feature. This ensures that data such as sample information is only created once, even if it appears multiple times in the imported file.
How It Works:
- Configure the duplicate lookup by selecting key fields (for example, collection date, location, and sample type).
- During the import process, the system checks for matching records. If a match is found, only one entity is created while all associated data (e.g., result values) reference this unique sample entry.
CSV File Import Considerations
Section titled “CSV File Import Considerations”CSV files are seamlessly integrated into the system by treating them as a spreadsheet. The positional references in CSV files align with those used in Excel files. For instance, cell references such as C4 continue to represent column 3, row 4 in both file types.
Example Workflow
Section titled “Example Workflow”Imagine a typical import scenario involving sample data and related result values:
-
General Setup:
Begin by configuring essential parameters such as date formats, file selection, and file-matching criteria. For Excel files, make sure to specify the sheet number to avoid dynamic sheet name issues. -
Defining Entity Tables:
- The Sample Table is set up using the “By Row” method, extracting information such as sample name and sample type from designated columns.
- The ResultValue Table is configured using the “Matrix” method. This table reads data from a block of cells (e.g., columns C to F) where:
- The first row specifies the type of measurement.
- The second row provides the measurement units.
- The remaining rows contain the measured values for each sample.
-
Field Mapping and Transformation:
Use the field mapping tool to connect spreadsheet cells to the corresponding fields in the Scifeon data model. If a single cell contains combined data (e.g., both sample name and type), apply the Text Before and Text After operations to separate the values. -
Managing Duplicates:
Configure the duplicate lookup settings (using key fields like date, location, and type) to prevent multiple entries of the same sample. This ensures that even if a sample appears more than once in the file, the system only creates one record and links all result values to it.